
Building in Remote Locations; How Challenges are Solved by Consultants
Major Construction, Building in Remote locations can Face Unique Challenges
Nationwide Consulting, LLC has Extensive Experience to Meet Those Distant Challenges
By Robert Hanson
Remote locations have many challenges that are not faced when building in populated areas. Successfully building in remote locations takes seasoned, experienced professional construction management to overcome those challenges. Nationwide Consulting LLC has extensive experience in successfully completing projects that are building in remote locations.
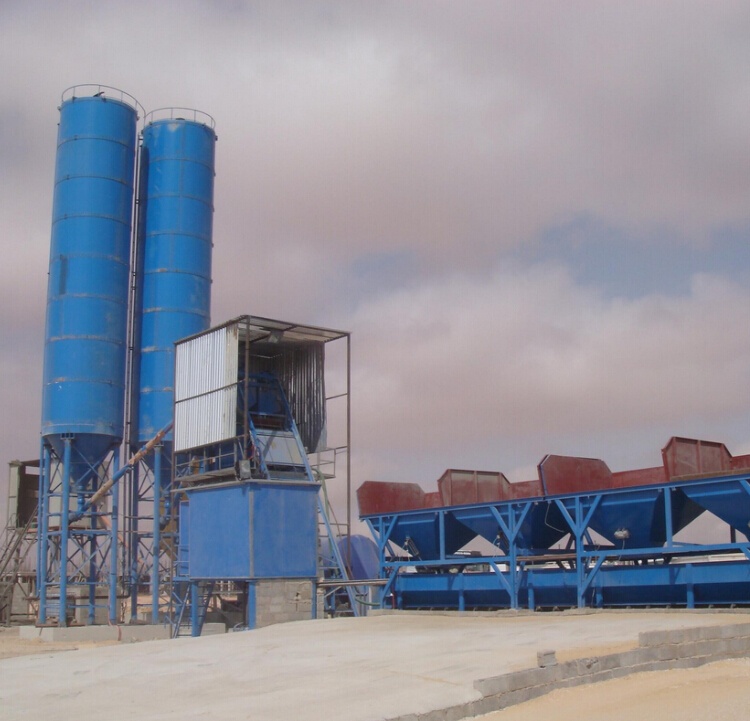
Concrete is the foundation of any construction project working and building in remote locations means you will need to have a portable concrete batch plant to produce your concrete. The challenges of operating a batch plant are many and close attention must be paid to every aspect of the operation. Here are some of things you need to know that will keep your remote concrete operation on track.
Inconsistent concrete slump test
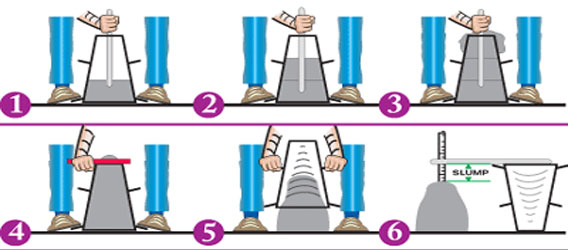
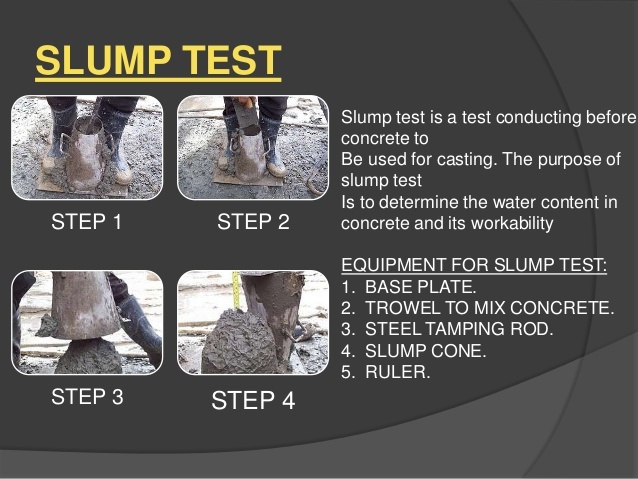
Simply defined, slump is a measure of the consistency of fresh concrete. The slump test is a very simple test. The slump cone is a right circular cone that is 12 inches high. The base of the cone is 8 inches in diameter and the top of the cone is 4 inches in diameter.
The test is carried out using a mold known as a slump cone. The cone is placed on a hard non-absorbent surface. This cone is filled with fresh concrete in three stages. Each time, each layer is tamped 25 times with a rod of standard dimensions. At the end of the third stage, concrete is struck off flush to the top of the mold. The mold is carefully lifted vertically upwards, so as not to disturb the concrete cone.
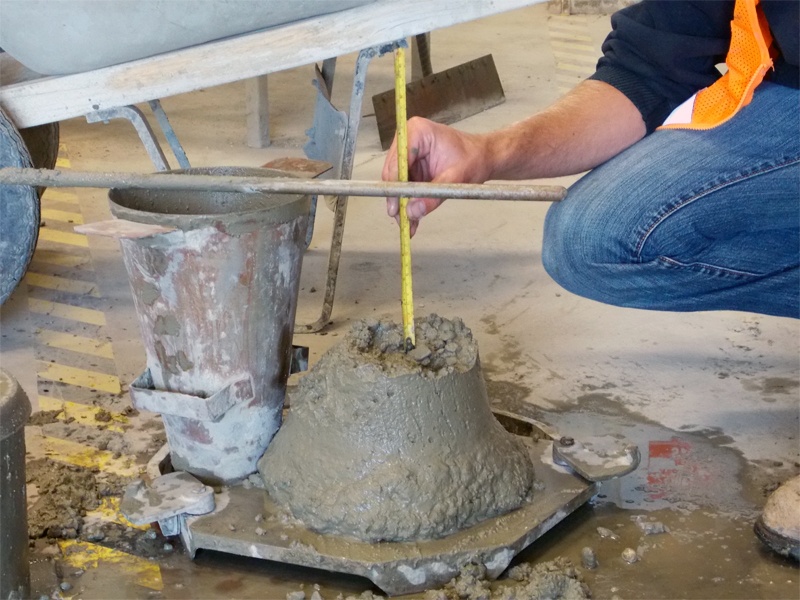
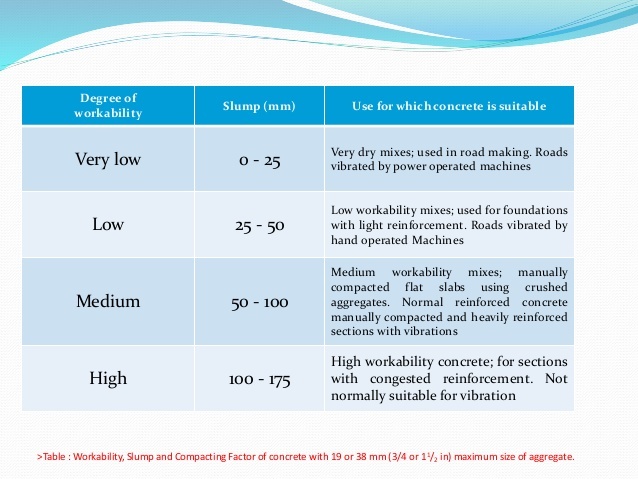
Only a true slump is of any use in the test. A collapse slump will generally mean that the mix is too wet or that it is a high workability mix, for which the slump test is not appropriate. Low workability mixes; having slump 10 – 40 mm are used for foundations with light reinforcement, medium workability mixes; 50 – 90 for normal reinforced concrete placed with vibration, high workability concrete; > 100 mm.
A slump is interpreted using the method below and is a direct result of how the concrete is mixed.
Rarely will a laboratory mix be entirely suitable under the variable field conditions. Adjustments to the amount of water and add mixtures are commonly required. Even with sophisticated computer control batch plants, batching tolerances can affect slump control. Water cement ratios can vary by about 0.01 however with uniform mixing batching tolerances shouldn’t affect slump by more than 1/2 inch.
ASTM C 94 requires total mixing water which influences slump in water -cement ratio is to be measured within plus or minus 3%. The plant total mix water includes free waters in the aggregate and aggregate should never be loaded dry.
Measuring and correcting for fine aggregate moisture content can significantly change slump. Many batch plant operator’s measure sand moisture content in the morning as temperatures rise during the day and the aggregate dries more water is absorbed reducing concrete slump. To indicate changes in sand moisture content the plant operator should be using a properly maintained and calibrated Sand moisture meter. At the Kwajalein site the wind is typically blowing 15 to 20 miles an hour with 85 plus degree air temperature therefore a moisture content in the morning is quickly diminished as the day goes on therefore it is important that all aggregate be continually kept wet and moisture content measured several times a day.
Mixing
To achieve a uniform concrete batch ASTM C 94 requires a minimum of 72 – 100 revolutions at mixing speed. Additionally, the volume of the mixed concrete should not exceed 63 % of the total drum volume. When the truck arrives on-site turn the drum another 30 revolutions at mixing speed to reduce any segregation that may occur during the haul. To assure that the concrete is within permissible slump range the load should be dumped within 30 minutes upon arrival on site or after initial adjustment of water whichever is later.
The first and last quarter yard discharges are exempt from this requirement. ASTM C 94 permits on site slump adjustment and allows for some adjustment if the truck arrives on site with the concrete slump less than specified.
Concrete to be pumped usually requires a High slump adding superplasticizers on site instead of water can attain a pump-able mix without increasing the water cement ratio.
Common Issues & Corrective Actions
The project is working with a designed mix with the expectation of achieving a 7 slump when the desired slumps are not met the following actions should be taken:
- Batch plant maintenance records should be checked to assure that scales are properly calibrated and batch plant is functioning at mix design requirements.
- Aggregate stock piles should not dry but rather wet tested for moisture content when loaded into batch plant.
- Supply water and aggregate should be checked for salt content.
- Truck volumes and mixing revolutions should be monitored closely.
- Batch plant maintenance and records
For an effective production & delivery of concrete, all plant & equipment should be maintained in a clean and efficient working condition. To achieve this, checklists are used by the batching plant personnel. These checklists include daily checks, weekly checks, monthly checks and quarterly checks. Checklists must be prepared in such a manner so that they cover the following 3 basic components of ready-mixed concrete batching plant.
- Storage & handling equipment
- Batching & mixing equipment
- Transporting equipment (Mixer & Agitator)
Weekly Storage and Handling Equipment Checks
- Check the area under plant for spillage and trace source
- Check all drains and traps are clear. Check cleanliness of yard
- Check to maintain settlement pits, recyclers and wash down areas in efficient working order
- Check all storage bins and doors for efficient operation
- Check conveyors, boom scrapers and bucket elevators for free running and wear and adjust as necessary
- Routine checks and servicing on loading shovels
- Routine checks and servicing on compressors
Daily Checks for Batching and Mixing Equipment
- Check and adjust tare weights and clean weight dials (if applicable)
- Check to ensure that weighing hoppers empty properly.
- Check to washout central mixer drum or pan
Weekly Checks for Batching and Mixing Equipment
- Check and maintain that all hoppers and doors are in clean and efficient working order
- Check central mixer blades, paddles or arms for wear and tightness and adjust as necessary
- Check and remove any cement or concrete build up in the mixer
- Check and shack out cement silo filter sock (if applicable) and maintain in efficient working order.
- Check dust seals on cement hoppers for wear
- Check and clean knife edges or load cells on weighing equipment
- Check calibration of moisture meter if applicable
- Check oil levels on air-line lubricators
- Drain water traps on air lines
- Check rams and air lines for leaks
- Check pipe-work for leaks and wear
- Check wiring and electrical apparatus for correct operation and over heating
- Routine checks for greasing of bearings and gears
- Routine checks and servicing on central mixers
Monthly Checks Batching and Mixing Equipment
- Check calibration of all weigh scales
- Check calibration of water meter
- Check calibration of admixture dispenser
Quarterly Checks Batching and Mixing Equipment
- Inspection and testing of all weigh scales over their complete operational range
- Routine oil changes in gearboxes and oil baths
Daily Check Transporting Equipment – Mixer & Agitator Units
- Check and wash out truck mixer drum
Monthly Checks Transporting Equipment – Mixer & Agitator Units
- Check mixer unit for blade wear
- Check operation of revolution counters, if fitted
- Check calibration of truck mixer water meter
Common Issues & Corrective Actions
- Require maintenance records be provided by plant operator weekly to Owner
- Make unannounced spot checks of records to actual plant conditions
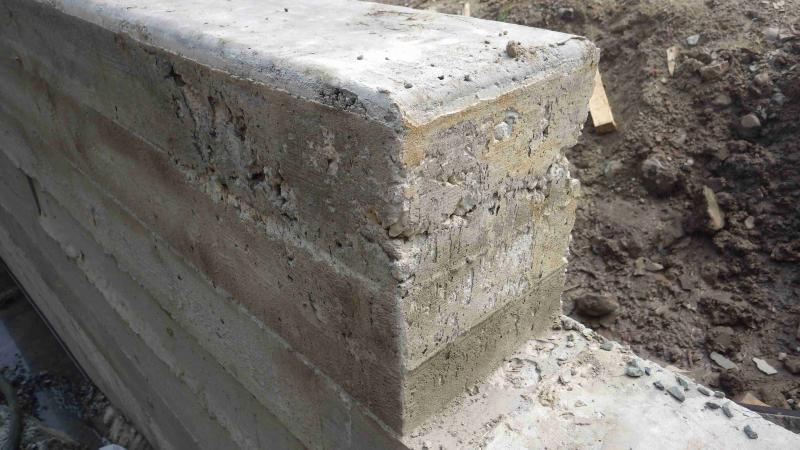
- Concrete Honeycombing
Consolidating and compacting freshly placed concrete with an internal vibrator is a fairly simple and straightforward process. A majority of honeycombing, rock pockets, sand streaks, pour lines and voids can be avoided by taking the time to properly train and educate employees on the proper use of internal vibrators and the future problems that may arise from incorrect vibration practices.
Freshly placed concrete can contain 5 percent to 20 percent entrapped air, ultimately reducing the concrete’s density. Concrete with a high percentage of entrapped air will likely have a reduced strength and increased permeability, which will greatly reduce the durability of the concrete product once in service.
In general the two most common mistakes made when using an internal vibrator are removing the vibrator head too quickly and dragging the vibrator head through the concrete. The properly trained individual will also realize that dragging a vibrator through the concrete will form a mortar channel in the concrete, creating a structurally weak area in the finished product.
When training individuals on the proper use of internal vibrators, it is important to explain the basic principles of how an internal vibrator works. Simply put, vibratory impulses liquefy the mortar, drastically reducing the internal friction between aggregate particles. The mixture becomes unstable, allowing entrapped air to rise to the surface while the heavier aggregates settle under the force of gravity into a dense matrix.

The amount of time that the vibrator must remain in the concrete will depend on the vibrator’s frequency and amplitude and the concrete’s workability. The frequency is the number of vibration cycles per minute and is often presented as revolutions or vibrations per minute (rpm or vpm). Frequency will have an effect on lighter masses, moving sand and slurry around aggregate and ultimately causing the mortar to liquefy. The amplitude is the maximum distance a point on the vibrating head moves from its position of rest. Amplitude will have an effect on heavier masses, moving coarse aggregate and ultimately determining the radius of action or influence. The radius of action is the area of concrete influenced by the vibrator.
Smaller-diameter vibrators will have higher frequencies and lower amplitudes, while larger-diameter vibrators will have lower frequencies and higher amplitudes. As a general rule, the diameter of the vibrator should be a quarter of the wall thickness of the product being cast. Smaller-diameter internal vibrators with higher frequencies are typically used for consolidating higher-slump concretes.
When using internal vibrators it is important to lower the vibrator vertically into the concrete, allowing the head to descend under its own weight. Internal vibrators should not be forced down into the concrete. The vibrator head should penetrate previously placed lifts of concrete by 6 inches (150 mm). If there is a considerable amount of time lapse between the placements of subsequent lifts, it may be necessary to re-vibrate the previous lift prior to placing additional concrete to minimize the potential for pour lines and cold joints.
Vibration times will vary depending on the size of vibrator used, the concrete’s workability and depth of the concrete member. According to the Portland Cement Association, an insertion time of 5 to 15 seconds will usually provide adequate consolidation. Another general rule of thumb is to allow the vibrator to sink under its own weight and then remove the vibrator at a rate of about 3 seconds per vertical foot (300 mm). Concrete should move to fill the hole left by the vibrator; otherwise briefly reinserting the vibrator nearby should solve the problem. The vibrator should then be reinserted close enough to the last location so that the radius of action overlaps the last one.
Employees should familiarize themselves with each vibrator and mix design used at the plant. Changes in the surface appearance of the concrete and the sound or feel of the vibrator are often good indications that the concrete has been adequately consolidated. Large air bubbles should stop rising to the surface as large aggregate particles embed themselves into the concrete, and a thin film of mortar (sheen) should appear on the surface. According to the American Concrete Institute, the pitch or tone of an internal vibrator will typically decrease when the vibrator is initially inserted into the concrete, because the frequency will be reduced. The frequency will then increase slightly then level off when the concrete is free of entrapped air. Vibrator operators should become familiar with these simple indicators.

Vibrator operators should also be conscious of heavily reinforced areas and the location of large block outs, which may require increased vibration times. Noting the quality of formed surfaces and defects during a post-pour inspection are important steps in determining if the proper vibration equipment and procedures have been followed.
Formed surfaces should be relatively free of bug holes and honeycombed areas. The presence of sand streaks, caused by heavy bleeding and mortar loss, and crazing, caused by drying shrinkage cracking of the mortar, are often indications of excessive vibration, moving concrete with a vibrator and the use of an improperly sized vibrator.
Freshly placed concrete in wall and column forms behaves like a liquid producing hydrostatic pressure that acts laterally on the vertical faces of the formwork. However, due to concrete stiffening, the hydrostatic pressure is only temporary. As the fresh concrete changes from a liquid into a quasi-solid, the lateral pressure diminishes.
Common Issues & Corrective Actions
- Assure that operators are properly trained in vibrating concrete
- Concrete placement & vibration personnel should be experience and be a consistent placement team.
- Areas where congestive steel are located require special attention to vibration detail and the work should be closely monitored by project engineer.
Reinforced rebar placement
Getting it in the right place and keeping it there during concrete placement is critical to the structure’s performance. Reinforcement should be placed as shown on the placing drawings. The drawings details will indicate the number of bars, bar lengths, bends, and positions.
Cover
One important reason for placing the reinforcing steel properly is to achieve the right amount of concrete cover that is the amount of concrete between the reinforcing steel and the surface of the concrete member. Cover is the single most important factor in protecting reinforcing steel from corrosion. Cover is also necessary to assure that the steel bonds to the concrete well enough to develop its strength. The requirements for minimum cover are usually listed in the project specifications or shown on the drawings.
Positioning
What’s important to remember is that the design of the structure is based on having the steel in the right place. Incorrect reinforcing steel placement can and has led to serious concrete structural failures. For example, lowering the top bars or raising the bottom bars by ½ inch more than that specified in a 6-inch-deep slab could reduce its load-carrying capacity by 20%.
You must use reinforcing bar supports, which are made of steel wire, precast concrete, or plastic. Chairs and supports are available in various heights to support specific reinforcing bar sizes and positions. In general, plastic accessories are less expensive than metal supports. The Concrete Reinforcing Steel Institute’s Ready Reference Reinforcing Steel Resource Guide or the classic Placing Reinforcing Bars has three tables that show most of the currently available supports in the various materials and describing the situation where each is most effectively used.
Simply placing the bars on supports is not enough. Reinforcing steel must be secured to prevent displacement during construction activities and concrete placement. This is usually accomplished with tie wire. The wire is typically 16½– or 16-gauge black, soft, annealed wire, although heavier reinforcement may require 15- or 14-gauge wire to hold the proper position of the rebar. A variety of tie types (ties are basically wire twists for connecting intersecting bars), from snap ties to saddle ties, are used in the concrete reinforcing industry.
For tying epoxy-coated bars it is recommended to use PVC ties (available from American Wire Tie). Proprietary Snap-On ties are also available, such as the Speed-Clip Rebar Tie from Con-Tie Inc. This is a simple device that attaches rebar in parallel or at any angle by hand.
The tie contributes no strength to the structure, so more are necessary only when the steel might become displaced during concrete placement. Be sure to keep the ends of the tie wires away from the surface of the concrete where they could rust. For preassembled mats or reinforcing steel, tie enough intersections to make the assembly rigid enough for placing—typically every intersection around the outside and every other in the middle of the mat.
Bar Supports

The amount of concrete cover over the reinforcing bar is very important. If it’s constructed properly, the concrete protects the reinforcing bar. Bar supports are used to hold the reinforcing bar up off the formwork or the ground to attain the proper depth of cover. They range from as simple as plain concrete blocks to plastic chairs, to wire bar supports.
Common Issues & Corrective Actions
- Validate the people positioning and tying the steel and ensure they have the proper training and experience to complete the work to design specifications
- Detailed inspections of steel placement and rigidity of the steel prior to pour
- Rework any steel placement that shifts during pour that does not maintain proper cover
Concrete Rework
Concrete rework is an expensive and time consuming job when building in remote locations. If the contractor is required to rework a large area, it will have a dramatic effect on schedule. Will cause personnel to fall behind in other scheduled work.
Common Issues & Corrective Actions
- Adequate supervision of mix slumps, placement of concrete and vibrations method must be maintained
- Project engineer should be engaged in every pour
- Common Issues & Corrective Actions
- An inconsistent labor pool is a large contributing factor to project rework issues and is the responsibility of the General Contractor to correct. It is also a large factor in schedule slip.
- Lack of consistent worker pool
- Require contractor to maintain a consistent experienced labor pool
- Require contractor to validate and demonstrate to the space fence management that replacement personnel are properly trained in the jobs they are performing
- Require contractor to maintain records of all personnel training and performance for the jobs they are assigned
- Closely monitor general contractor records to ensure experienced personnel are hired
- Put the contractor on written notice and back charge contractor when inexperienced personnel are identified.
A strong experience construction manager is there to facilitate the construction process, work with the contractor to close any gaps in the construction details, answer RIFs promptly and enforce some basic rules given to the contractor at the first kickoff meeting to set the tone of the relationship from day one.
- Continuous documenting of work from day one to serve as reference in the event Owner is forced to take legal action against the contractor for under performance.
- Contractor must always be truthful and forthcoming with information
- Misrepresentation and/or dishonest acts would be grounds for dismissal & replacement
- Bad news does not get better with age – all issues need to be reported to Owner management immediately upon recognizing the problem by contractor
- Inform the contractor we are here to perform this job as efficiently and professionally as possible in the best interest of the client.
When it has to be done right, hit the Expert Button

Call Nationwide Consulting, LLC today for a free consultation and you hit the expert button:

Nationwide Consulting, LLC
Robert E. Hanson
Principal Partner
410.336.4961
![]()